- 778-761-4545
- Serving Kelowna and Surrounding Area
Menu
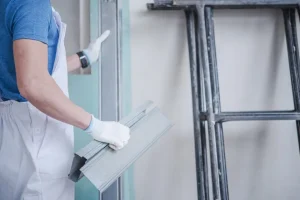 After completing your drywall project, your ready to apply that first coat of paint. So whether you opt for a smooth or textured wall, you most likely want results that last the test of time. And that’s not all when it comes to drywall. Since sheetrock is taped and nailed, the joints might show under the paint skin. Is this why you need a primer? Well, you need to prime drywall for various reasons. Let’s see why.
It’s tempting to skip the priming step and go directly with the office or residential painting. Isn’t it? Who wants to waste time on the extra work of priming? Well, no one. And that’s why most of the time, you need to prime drywall before you paint it. Despite the common belief that it’s a waste of time, primers save time and money. Why? Because they help topcoats dry faster. Otherwise, they will be absorbed by the drywall and will take much longer to dry. You don’t necessarily have to apply two hands of coating. If the drywall is in moderately good condition and you are not trying to paint white over black, one hand of coating will suffice. Thanks to the primer.
One of the most significant benefits of primers is superior paint adhesion. Think of it as the glue, which will make the paint stick to the surface. And that’s good news since it will keep the paint intact for a much longer time. Also, it will show off the color you choose – since the drywall will not absorb it. This is particularly crucial when you paint walls with dark colors. They won’t fade away down the road.
And one more thing. Since paint adheres better on drywall when you prime first, walls are cleaned easier and without altering the color. It’s best to apply one coating after priming than two coatings without priming.
Primers act as a sealant, which won’t only block out paint penetration into the drywall but cover minor flaws too. Although drywall repair is necessary before painting for the best possible results, tiny blemishes are easily covered with the primer. And since this is an extra coating, it insulates the walls better and provides protection against drywall damage.
At the end of the day, what you get is a smooth appearance because the primer will become the base that will preserve both the drywall and the color.
It’s essential to prime after new drywall installation. The new surface will be porous and will absorb the color of the paint. Primers will also cover the joint compound and provide a reliable base for texturing or painting over skim-coated drywall. Then again, you won’t need to prime if you choose a paint & primer in one – although different products are always best. But you need to prime to cover patched drywall sections or when you want to paint drywall in the kitchen and bathroom – since it acts as a seal, it can inhibit mold growth too.
What is the primer? It’s simply an undercoat applied on drywall (or other materials for that matter) for improved paint adhesion and thus long-lasting results. Most people use latex primers, but it’s always best to ask your painting contractor.
Be careful which primer you choose regarding which color you selected to paint drywall. Opt for tinted primers only if you paint dark drywall hues. But make sure the tinted primer won’t alter the wall hue.
Who doesn’t want their house to look flawless, right? But all too often, when everything else is looking nice and clean, you notice those patches of mold damaging the beauty of your house. But luckily, mold issues are very common and easy to fix. So much so that you can do it yourself.
This article will go over why molds form and 5 tips on removing them from drywall. Let’s get started:
What causes mold build-up?
Mold spores float all around us. They look for a good place to live and feed on. A humid place is ideal for mold spores to expand their growth as that offers them a continuous source of food.
Drywalls with an inside leak or enough moisture can work as living places for mold spores. Plus, the paper materials in the wall can be their source of food. When those things come together, mold spores multiply, and you notice them ruining your wall.
The sooner you make this decision, the better. Because then you don’t have to spend time cleaning the damaged wall. To make this decision, you must inspect how much the mold harmed the drywall.
An excellent way to find out is by touching the drywall surface and sensing its toughness. If it feels soft, then the mold and moisture have taken their toll on the wall and took away the structural integrity.
In such cases, it’s best to ensure there’s no way the mold grows back. So replace the old wall with a new one. It’ll give you a fresh start.
Even if you remove the mold from your drywall temporarily, it might grow right back if you don’t address the root. It could be a pipe leak inside the drywall or a badly insulated ductwork. Or just high vapor that’s causing the mold growth.
Whichever it is, find the source of moisture and fix that. Otherwise, you might need to spend hours removing mold from the wall every month till you have to replace the wall. Then you might need to keep replacing the walls too. Finding the source will fix the current mold problem and prevent further mold problems.
To clean mold in the deeper parts of the wall, you’ll have to first deal with the surface mold. Since mold spores are airborne and easy to spread, you must be well-equipped to stop the spread to other surfaces.
First, cover yourself well, so the mold doesn’t cause you irritation.
Second, vacuum out the surface mold with a HEPA filter. It’ll ensure all the mold on the surface gets removed safely.
Third, cover other surfaces in the room, so mold spores don’t land on them and expand the growth again.
If you can follow these 3 steps well, the chances are high that it won’t grow back on other surfaces.
After removing the surface mold, you’ll need to kill the mold in the deeper parts of the wall. Usually, bleach is good enough to remove the stains on the wall surface. But it doesn’t go deep enough in the wall to kill all the mold. You can use a mixture of white vinegar, water, and baking soda (1:1:2 ratio) or 3% Hydrogen Peroxide for this. Spray the mixture on the drywall and sit back as it kills the mold patches.
Next, dry the wall with a fan for hours. Vinegar can have quite a strong smell, so keeping the windows open or the room well-ventilated will help the odor escape and the wall dry up fast.
Maybe you’ve successfully removed the mold from the drywall. Now it’s time to prevent it from reappearing on the drywall. To do that, first, spray the wall with an anti-microbial spray like the Concrobium mold control that’ll prevent further mold growth. Then you might then notice the drywall has been discolored. It’s because of the mold and treatment.
Next, cover the drywall surface with a mold-resistant paint of your choice. It’ll ensure your wall stays mold-free for years to come. Further, now you have cutting-edge drywall enhancing the look of your house. A clean house has a massive effect on the health and mood of the residents. You’ll feel more prepared for the problems life throws at you.
While you can be very diligent when cleaning all parts of the house, it’s only human to miss out on certain parts like the wall. Plus, you may not even expect mold.
Use the tips shared in this article, and you’ll be fully prepared to face future infestations. Fortunately, it’s not too hard to remove mold from drywall. And when you get the mold removed, you can have a new beginning with drywall that prevents mold growth. But remember — you might just have to replace the drywall if it’s damaged is too severe.